Preview Environments
Preview environments let you deploy temporary, isolated copies of your applications to test changes before promoting them to production. Each preview runs on your existing cluster in its own namespace with dedicated resources, optional database clones, and configurable external DNS endpoints.
Overview
Preview environments solve the problem of testing changes in a production-like setting without affecting live traffic. Key capabilities:
- Multi-service previews — Deploy one or more applications together in a single preview
- Automatic database cloning — CNPG databases are automatically cloned so your preview runs against real (but isolated) data
- Per-service approval — Approve individual services or the entire preview at once for promotion
- External DNS — Optionally expose preview services with public
*.preview.kovra.devendpoints with auto-provisioned TLS - Automatic cleanup — Previews expire after a configurable TTL and are cleaned up automatically
- Variable detection — Database connection strings are automatically detected and rewritten to point at the cloned database
Creating a Preview
Navigate to Previews in the sidebar and click New Preview. The creation wizard guides you through five steps:
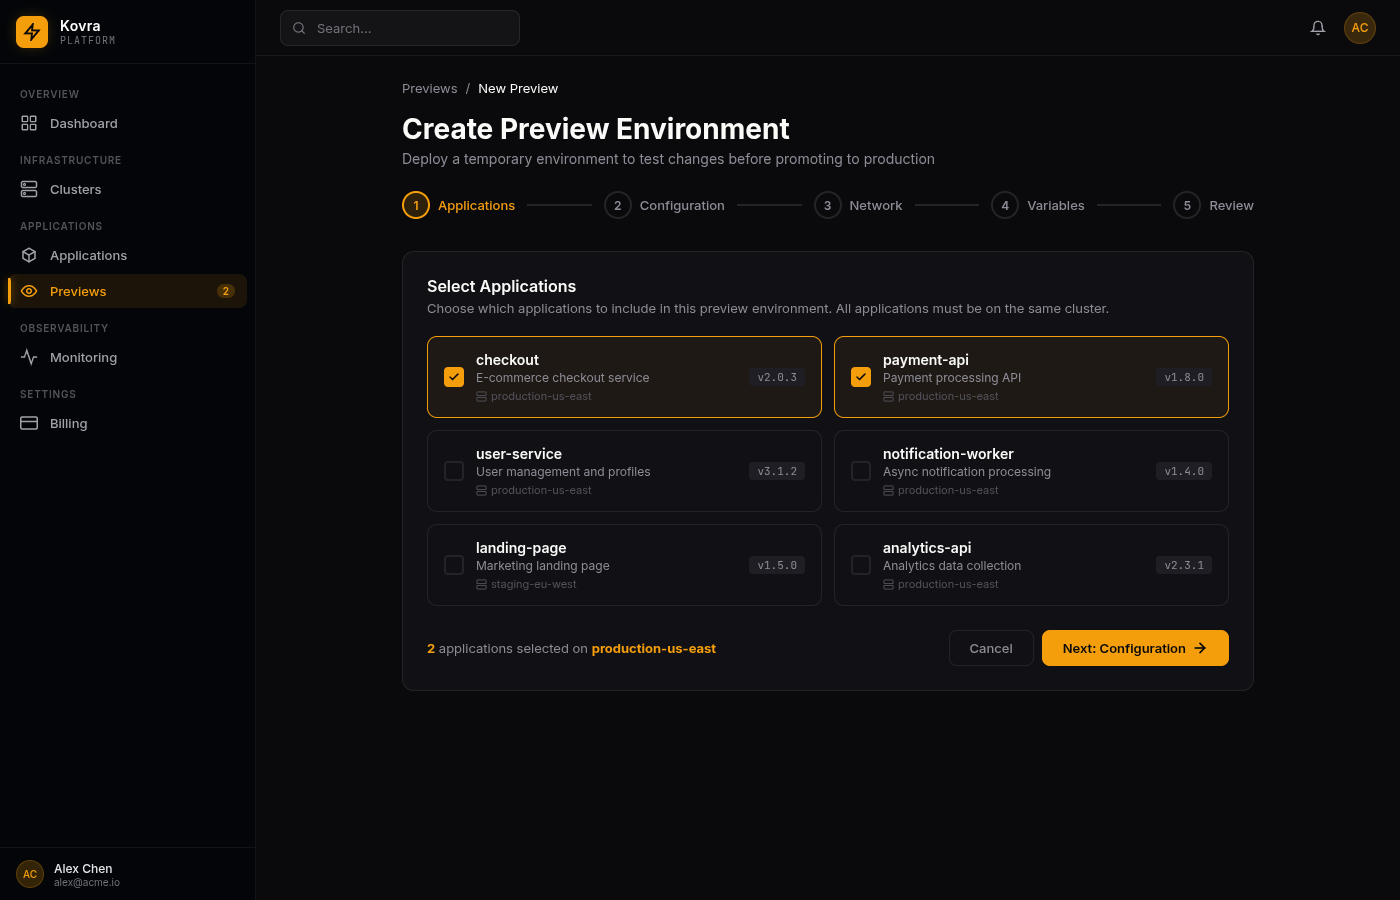
Step 1: Select Applications
Choose which applications to include in the preview. All selected applications must be on the same cluster. The wizard shows each application’s current version and cluster.
You can select multiple applications to test how they interact with new versions together — for example, testing a checkout service upgrade alongside its payment API dependency.
Step 2: Configuration
Configure each service in the preview:
| Setting | Description | Default |
|---|---|---|
| Preview Name | Human-readable name for the preview | Required |
| Target Version | The version (image tag) to deploy | Required |
| TTL | Hours before the preview expires | 24 hours |
| Replicas | Number of pod replicas | 1 |
| CPU Request/Limit | CPU resource allocation | 100m / 500m |
| Memory Request/Limit | Memory resource allocation | 128Mi / 512Mi |
| HPA | Horizontal Pod Autoscaler settings | Disabled |
Step 3: Network
Configure external access for each service:
- External DNS — Toggle to create a public
{service}-{previewId}.preview.kovra.devendpoint with auto-provisioned TLS certificate - Internal only — Services without external DNS are accessible only within the cluster namespace
Internal DNS references are shown so other services in the preview can communicate via cluster-internal hostnames.
Step 4: Variables
Environment variables are automatically copied from the source application. The platform detects database-related variables and offers to rewrite them:
- Copied — Standard environment variables, copied as-is from the source
- Auto Override — Database connection strings (detected by name patterns like
DATABASE_URL,DB_HOST,POSTGRES_URL, etc.) automatically rewritten to point at the cloned database - User Override — Variables you’ve manually edited
You can review and modify any variable before creating the preview.
Step 5: Review
Review the complete preview configuration including all services, resource allocations, network settings, and variable overrides. Click Create Preview to start deployment.
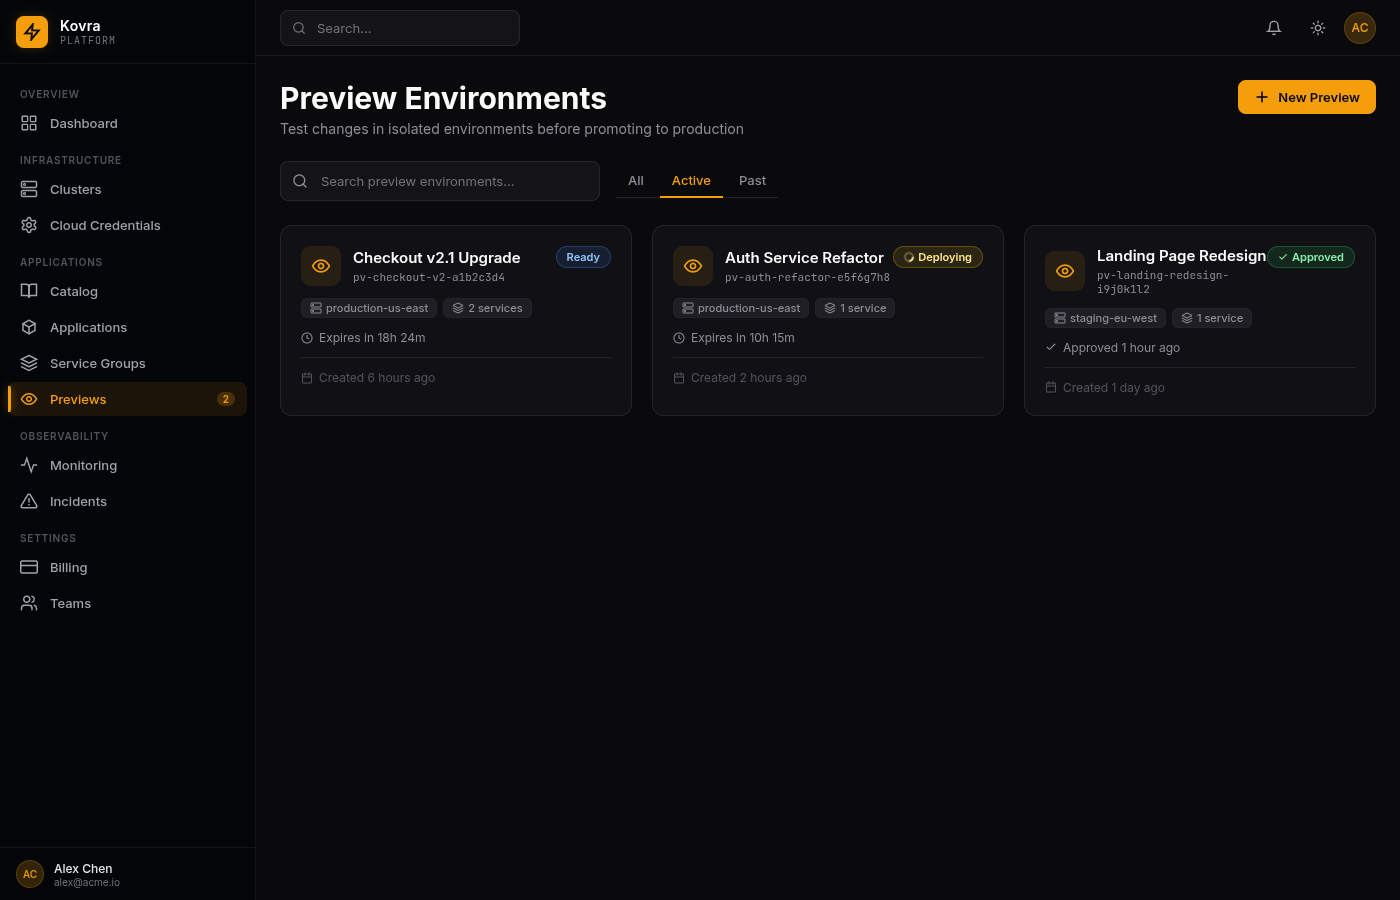
Preview Lifecycle
A preview goes through these statuses:
| Status | Description |
|---|---|
| Pending | Preview created, waiting for deployment to start |
| Deploying | Namespace setup, database cloning, and Helm installations in progress |
| Ready | All services deployed and healthy — ready for testing and approval |
| Approved | All services approved — promoted versions are being applied to production |
| Completed | Promotion finished, cleanup in progress |
| Rejected | Preview was rejected, cleanup in progress |
| Expired | TTL elapsed, automatic cleanup in progress |
| Failed | Deployment encountered an error |
Preview Detail Page
Click any preview card to see its full detail view:
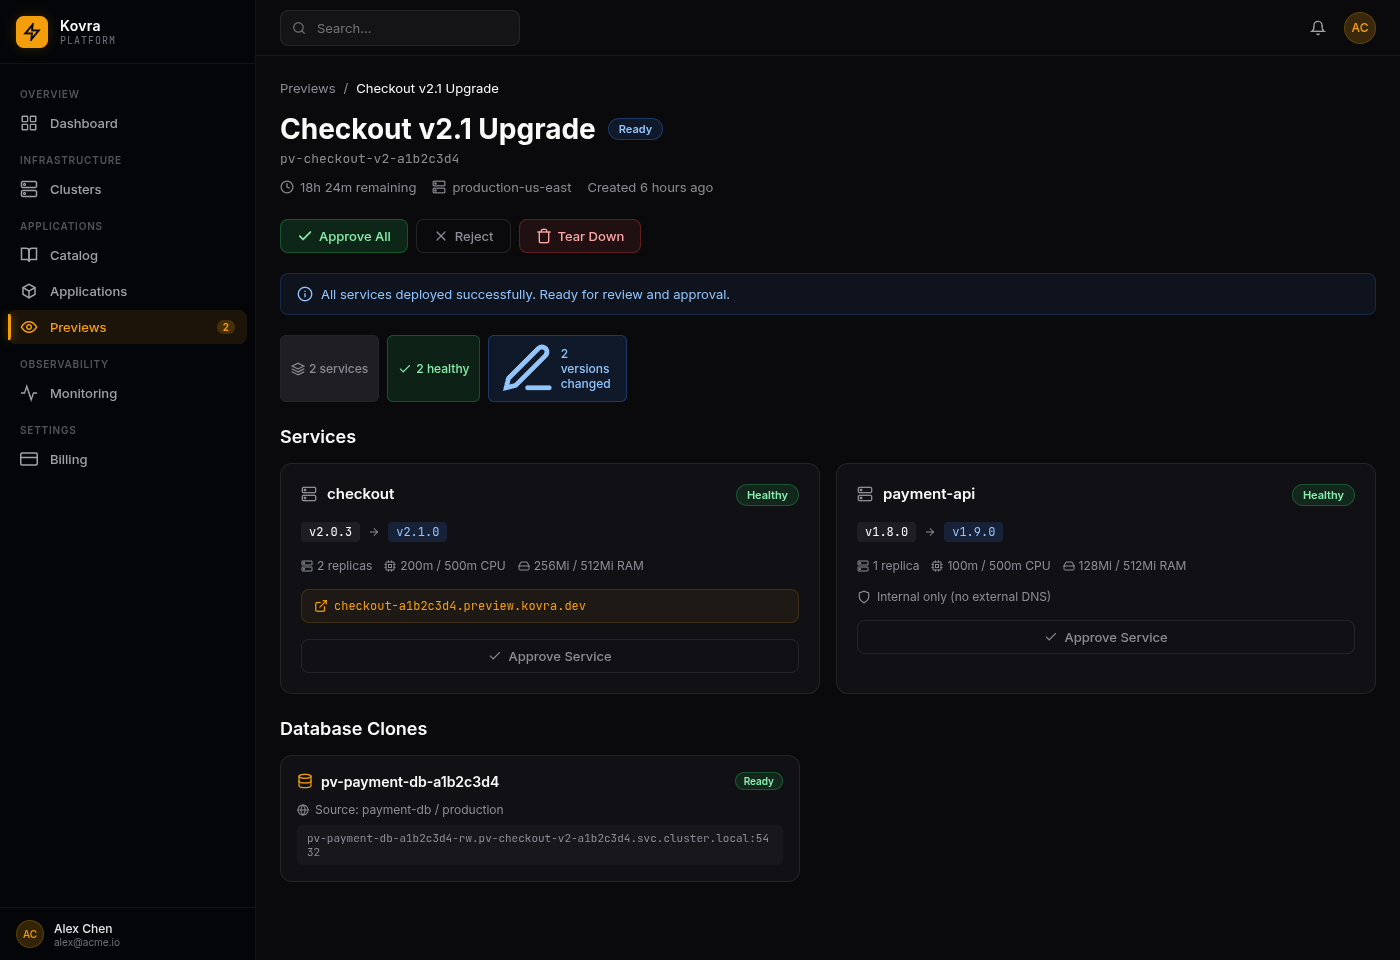
The detail page shows:
- Status and time remaining — Current preview status with countdown to expiry
- Action buttons — Approve All, Reject, or Tear Down the preview
- Status message — Deployment progress or error details
- Summary badges — Service count, healthy count, version changes, and approval count
- Service cards — Detailed view of each service with version diff, resources, and external URL
- Database clones — Status of any cloned databases with their connection endpoints
Service Cards
Each service card displays:
- Version change — Source version → target version with visual diff
- Health status — Healthy, Deploying, Unhealthy, or Failed
- Resource allocation — Replicas, CPU, and memory settings
- External hostname — Public URL if external DNS is enabled
- Approve button — Approve this specific service for promotion
Database Clones
When a service’s source application has a CNPG (CloudNativePG) database, the preview system automatically:
- Discovers the CNPG cluster in the source namespace
- Creates a clone via the CNPG Helm chart
- Extracts the clone’s connection endpoint
- Rewrites database variables in the preview service to point at the clone
The database clone section shows the clone name, source reference, status, and the internal hostname for connecting.
Approving and Promoting
When a preview is Ready, you can:
- Approve All — Approve every service at once and trigger promotion of all target versions to production
- Approve individual services — Click the Approve Service button on specific service cards for granular control
- Reject — Reject the preview and trigger cleanup
Approval is idempotent — approving an already-approved service is a safe no-op.
When all services in a preview are approved, the preview status changes to Approved and the platform publishes promotion events for each service to update the production deployments.
Automatic Cleanup
Previews are cleaned up automatically — you don’t need to manually tear down resources:
- TTL expiry — When the configured TTL elapses, the preview is automatically cleaned up
- After rejection — Cleanup starts immediately when you reject a preview
- After approval — Once all services are promoted, cleanup begins automatically
All resources associated with the preview (services, databases, DNS records, certificates) are removed during cleanup.
Limits and Quotas
| Limit | Default | Description |
|---|---|---|
| Concurrent previews | 5 per org | Maximum active previews per organization |
| TTL range | 1–168 hours | Minimum and maximum preview lifetime |
| Resource quota | 1 CPU / 4Gi RAM | Per-preview namespace resource limits |